I had a very difficult time creating and maintaining a tunnel between two computers over the Internet. The reason I wanted this tunnel was to safely encrypt data between the two without having to configure security into every service. Most site-to-site VPN tunnels are built using dedicated hardware such as a Cisco ASA 5505 however in my case this was a home project and needed to be satisfied on a budget.
The first step to building the tunnel is understanding your network. In my case the computers were both behind a router with unique NAT subnets. Computer A had a NAT of 192.168.1.0/24 and Computer B 192.168.2.0/24 (shown below).
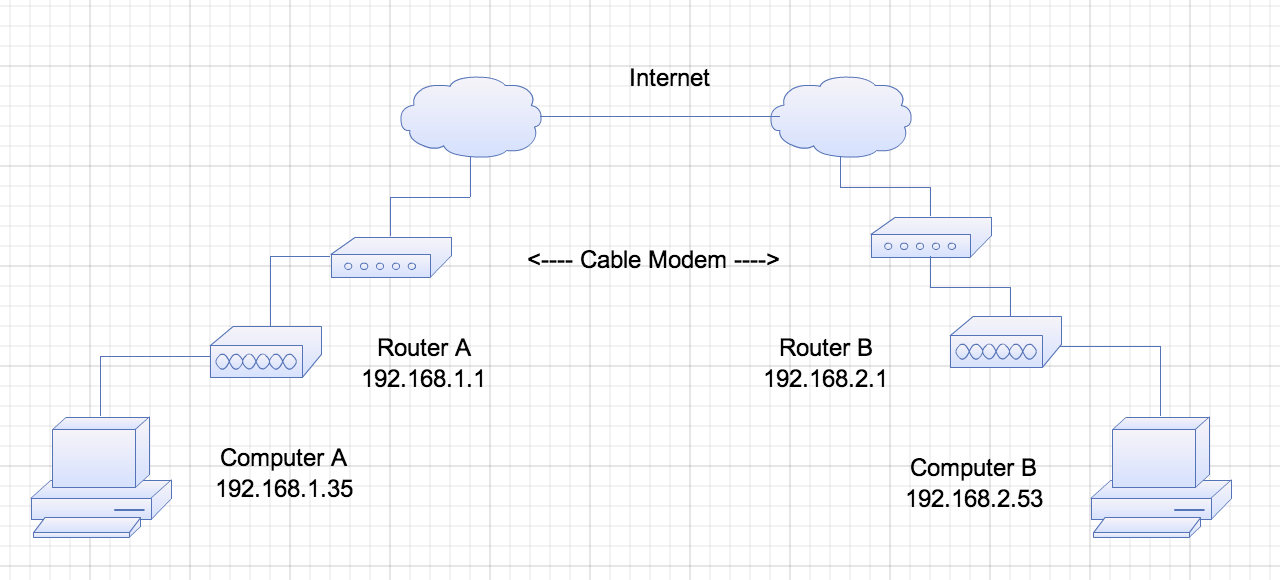
Network Topology for SSH VPN Example
Once you understand your network structure the next thing you need to do is setup SSH keys between your servers, if you haven’t already. This is outside the scope of this post but here is a great article: SSH Public Key Guide.
The next step is configuring /etc/network/interfaces. In this example we want Computer A to join Computer B’s network (192.168.2.0/24) with the IP 192.168.2.25 (these are all arbitrary IPs used to define an example). First we will configure the tunnel on Computer A giving it an IP address 192.168.2.25 and instructing it to send all 192.168.2.0/24 traffic through the tunnel. Second, we will configure Computer B to forward all traffic from the tunnel into the network but also add a route back to the 192.168.1.0/24 network through the tunnel.
On Computer A:
sudo nano /etc/network/interfaces
Add the following at the end
#SSH Tunnel to Computer B
iface tun0 inet static
pre-up ssh -S /var/run/ssh-vpn -M -f -w 0:0 username@ComputerB "/sbin/ifdown tun0;/sbin/ifup tun0"
pre-up sleep 5
address 192.168.2.25
pointopoint 192.168.2.53
netmask 255.255.255.255
up ip route add 192.168.2.0/24 via 192.168.2.25
down ip route del 192.168.2.0/24 via 192.168.2.25
post-down ssh -S /var/run/ssh-vpn -O exit username@ComputerB
On Computer B:
sudo nano /etc/network/interfaces
Add the following at the end
#SSH Tunnel to Computer A
iface tun0 inet static
address 192.168.2.53
pointopoint 192.168.2.25
netmask 255.255.255.255
up arp -sD 192.168.2.25 eth0 pub
Now, everything should be configured. Of course replace all IPs with the correct one’s for your network configuration. To test bring up the tunnel on Computer A by doing:
ifup tun0
If no error messages appear then you can continue to test the tunnel by doing a ping:
ping 192.168.2.53
If this fails check all of your IPs again as it is likely a configuration error.
Now to the persistant part of the whole thing. On Computer A we will add a script to check the tunnel and reestablish it if down.
On Computer A:
nano /usr/local/bin/checktun0
And paste the following code:
#!/bin/bash

if [ ! -d /sys/class/net/tun0 ]; then
	/sbin/ifdown tun0; /sbin/ifup tun0
Then modify the permissions and add the script to crontab:
chmod a+x /usr/local/bin/checktun0
crontab -e
Paste the following line at the end:
* * * * * /usr/local/bin/checktun0
Now your tunnel will start when your box starts, close properly when it goes down, and automatically be checked every minute and restart the tunnel if down.
0 Comments